Choosing urban cycling safety gear is less about buying the most expensive equipment. It is about matching protection to your route, traffic conditions, weather, and riding habits. A helmet may be essential, but it cannot correct poor visibility or careless positioning. Good equipment supports safer decisions; it does not replace them.
This guide examines urban cycling safety gear through practical riding experience and established safety principles. We will consider helmets with recognized safety certification, bright front and rear lights, reflective details, gloves, eye protection, and weather-resistant clothing. Each item should fit properly and remain comfortable during ordinary trips. A helmet that shifts at every intersection is not reliable, regardless of its brand. Tight gloves can also reduce control, especially during longer rides.
Small details matter. Reflective strips can catch a driver’s attention near a dark junction. Clear lenses may protect your eyes from dust, rain, and sudden wind. A rear light should remain visible when a backpack covers part of your jacket. Think about your actual journey. A quiet suburban lane needs different preparation from a crowded avenue with buses and delivery vehicles.
There is no perfect setup. I have found that riders sometimes carry too much equipment and use none of it correctly. Others trust bright clothing while neglecting lights after sunset. That is worth reconsidering. Safety choices should be tested during real rides, adjusted after uncomfortable experiences, and checked regularly for damage. The right gear feels dependable, but it should never encourage overconfidence.
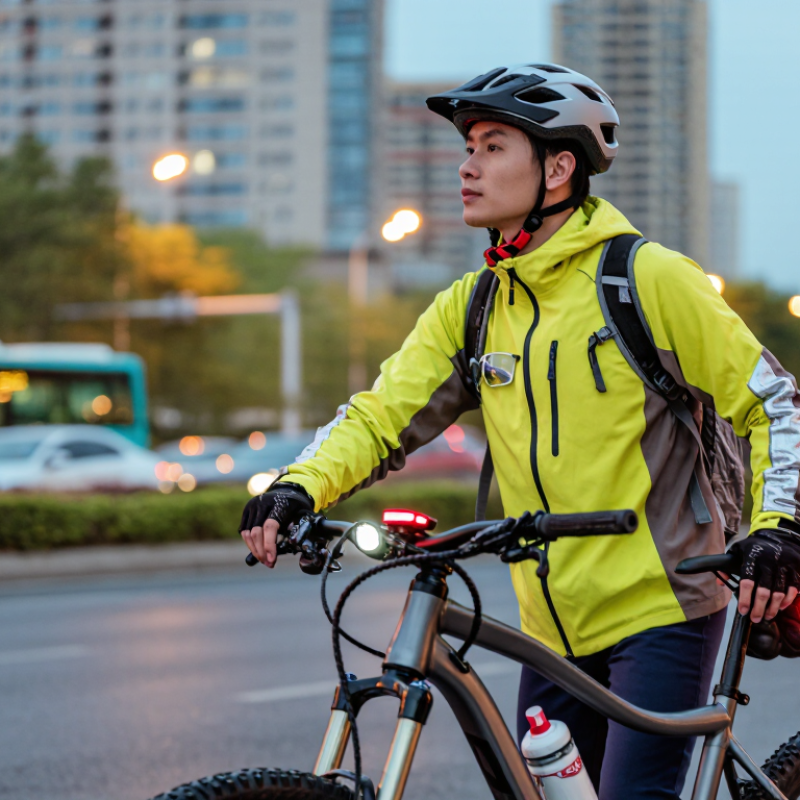
How to Choose Urban Cycling Safety Gear?
Define Your Urban Cycling Safety Needs and Riding Environment
Start with your route. A quiet residential street needs different protection from a crowded downtown corridor. I consider traffic speed, road surface, weather, and trip length before choosing gear. Wet tram tracks, potholes, and sudden car doors can shape the decision. A properly fitted helmet should meet recognized safety standards and sit level above your eyebrows. It should feel secure without pressing painfully.
Visibility matters. In daylight, bright clothing and reflective details help drivers notice movement. At night, front and rear lights are essential, even on familiar roads. Gloves improve grip and protect your palms during a fall. Clear glasses can block dust, rain, and insects. For colder rides, layered clothing prevents overheating while keeping hands warm. Small choices often affect control more than expensive equipment.
I learned this late. My first setup was too warm, and I removed layers beside traffic. That was careless. Test your gear on a short, low-pressure ride before commuting. Check whether straps stay fixed, lights remain visible, and pockets hold essentials securely. Riders with longer journeys may need rain protection, while slower routes may require less insulation. Reassess after changing your bicycle, route, or riding schedule. Safety advice should guide judgment, not replace it.
A helmet is your closest layer of protection in daily urban traffic.
For everyday cycling, fit matters more than color, vents, or appearance. Place it level on your head, with the front edge about two finger-widths above your eyebrows. It should cover your forehead without blocking your view. The helmet must feel snug, but it should not create pressure points.
Try the shake test. Move your head gently from side to side. If the helmet shifts noticeably, adjust it before riding.
I once chose a loose helmet because it felt comfortable. It looked fine, but it would not have stayed secure during a sudden stop.
Adjust the side straps so they form a flat V around each ear. The buckle should rest beneath your chin, not against your jaw. Leave space for one or two fingers under the strap.
Check the product label for compliance with a recognized cycling safety standard, and follow its fitting instructions. Avoid second-hand helmets when their history is unknown. Internal foam can hide damage after a crash.
Inspect the shell, straps, and buckle regularly for cracks, fraying, or loose parts. Replace the helmet after a significant impact, even without visible damage.
I still sometimes rush this check on busy mornings. That habit needs correcting. A properly fitted helmet should become part of the departure routine, like checking the brakes and lights.
Urban cycling safety gear should begin with visibility, not fashion.
NHTSA’s Traffic Safety Facts reported 1,105 pedalcyclist deaths in the United States during 2022. Dark jackets disappear beside parked cars, especially at dusk. Choose fluorescent yellow, orange, or green for daylight riding. Add reflective panels around the chest, back, wrists, and ankles for night travel.
Visibility needs movement. Reflective ankle bands catch headlights as your legs rotate. A rear light also helps, although clothing alone cannot solve every visibility problem. A Cochrane review of visibility interventions found that conspicuity aids can reduce collision risk, particularly in daytime traffic. I prefer a bright outer shell over a dull backpack. Small details matter.
Weather layers should manage heat, rain, and wind separately. The National Weather Service wind-chill guidance shows how moving air can make cool conditions feel significantly colder. Wear a moisture-wicking base layer, a breathable middle layer, and a wind-resistant shell. On wet commutes, taped seams and a longer rear hem protect the lower back. Ventilation matters too. I once overdressed for a mild, windy ride and arrived soaked from sweat. That mistake still influences my choices. Gloves should remain flexible enough for braking, while shoe covers can prevent cold rain from entering at the toes. Forecasts change. Carry one thin layer anyway.
Urban Cycling Safety Gear: Lights, Reflective Gear, and Essential Protective Accessories
Urban cycling safety gear should help drivers notice you before they need to react. On a dim commute, I use a steady front light and a red rear light. Flashing modes may attract attention, but local rules can limit their use. Check brightness and mounting position before every ride. A light aimed at the road reveals potholes without shining into faces. Keep spare batteries or charge indicators ready. Small failures become serious after sunset.
Reflective details work when headlights reach them. A vest, ankle bands, and reflective strips on a backpack create moving points of light. Motion matters. Ankle bands can make pedaling easier to recognize than a flat jacket patch. Wear bright colors during daylight, but do not treat color as a substitute for reflectivity. I once relied on a pale raincoat and felt visible. In traffic, I was not. That mistake changed my evening routine.
Protective accessories should fit the actual ride, not an imagined one. A certified helmet should sit level, cover the forehead, and stay secure during a quick head turn. Gloves improve grip and protect skin during a fall. Clear glasses reduce wind, dust, and sudden glare. A bell or audible alert supports calm communication with pedestrians. Check straps, lens scratches, and loose fasteners weekly. I still forget sometimes. That is exactly when it matters most.
Add lights, reflective gear, and protective accessories based on visibility conditions, traffic speed, and riding duration.
These are practical urban-cycling planning targets rather than universal legal minimums. Choose a white front light and red rear light, use reflective elements on moving body areas, and wear a properly fitted certified helmet. Check local lighting regulations before riding.
How to Choose Urban Cycling Safety Gear?
Urban riding exposes small weaknesses quickly. A helmet may feel secure in a shop, then press your forehead after forty minutes. I check the fit while wearing my usual hairstyle and glasses. It should sit level, stay stable, and leave no painful pressure points. The World Health Organization reports that bicycle helmets can reduce severe head injury risk by about 69%. This supports careful fitting, not casual buying. A helmet without the correct safety certification is a poor compromise.
Durability matters beside comfort. Reflective panels should remain visible after repeated washing. Gloves need strong palms for sudden braking, while lights must tolerate rain and daily vibration. NHTSA recorded 1,105 bicyclist deaths in the United States in 2022, showing why visibility deserves attention. Compatibility is equally practical. Check whether lights fit your handlebar, whether panniers block reflectors, and whether gloves work with electronic controls. I once chose a thick jacket that looked protective but restricted shoulder movement. It made turning awkward. That mistake changed my checklist.
Tips: Test every item on the actual bicycle. Ride slowly around a quiet block. Check helmet movement, light angles, zipper access, and brake control. Replace damaged equipment, even when it still looks usable. Read certification labels and care instructions. Consider weather, storage space, and repair costs before paying. Cheap gear is not always economical. Sometimes, it simply fails earlier.
Consider traffic speed, road surfaces, weather, and trip length. Wet tracks and potholes need extra attention.
Keep it level, with the front edge about two finger-widths above your eyebrows. It should feel snug, not painful.
Try the shake test. Move your head gently. If the helmet shifts, adjust the straps before riding.
Check the shell, straps, buckle, and foam for damage. Replace it after a serious impact, even without visible cracks.
Wear bright clothing with reflective details during daylight. Use front and rear lights at night, even on familiar streets.
Gloves improve grip and protect your palms. Clear glasses block dust, rain, and insects.
Test items on your actual bicycle. Ride slowly around a quiet block and check shoulder movement, brake control, and light angles.
Use layers for colder rides. They should keep you warm without causing overheating or restricting movement.
Confirm lights fit the handlebar and panniers do not block reflectors. Gloves should work with electronic controls.
Do not remove layers beside traffic. I once chose excessive insulation and created unnecessary distraction. That habit needed correction.
Choosing the right urban cycling safety gear begins with understanding your daily routes, traffic conditions, riding speed, and local weather. Start with a properly fitted helmet that sits securely and comfortably without restricting your vision or movement. High-visibility clothing can help you stand out in busy streets, while breathable layers, waterproof protection, and seasonal clothing can improve comfort during changing weather.
Complete your setup with front and rear lights, reflective details, and practical protective accessories suited to your riding environment. Before buying, check that every item fits well, feels comfortable, and can withstand regular use. Make sure your helmet, clothing, lights, gloves, and other equipment work together without limiting your mobility or interfering with your bicycle controls. By balancing visibility, protection, comfort, durability, and compatibility, you can create urban cycling safety gear that supports safer and more confident everyday journeys.