0%

Choosing the best front and rear bike light sets is not simply a brightness contest. A useful set should help other road users notice your position, direction, and movement. It should also remain secure when the road becomes wet, uneven, or poorly lit.

John Forester, a respected cycling transportation engineer, wrote, “Cyclists fare best when they act and are treated as drivers of vehicles.” His principle remains relevant to lighting. A front light should illuminate the path without creating harsh glare. A rear light should provide a clear red signal from a practical distance. Together, they create a more understandable presence in traffic.

The strongest front and rear bike light sets usually combine steady and flashing modes, simple controls, reliable mounting, and enough battery life for the intended journey. USB charging is convenient, but charging habits still matter. A powerful light is not automatically a better light. Excessive brightness can distract others and reduce practical visibility.

Weather resistance also deserves close attention. Rainwater around a charging port can become a small but costly weakness. Vibration may loosen an otherwise excellent bracket. These details are easy to overlook.

There is no perfect set for every rider. Commuters, weekend cyclists, and rural riders face different conditions. Even careful testing has limits. Real streets include rain, reflections, hills, and impatient traffic. This guide compares the features that matter most, while admitting that specifications alone cannot predict every ride.
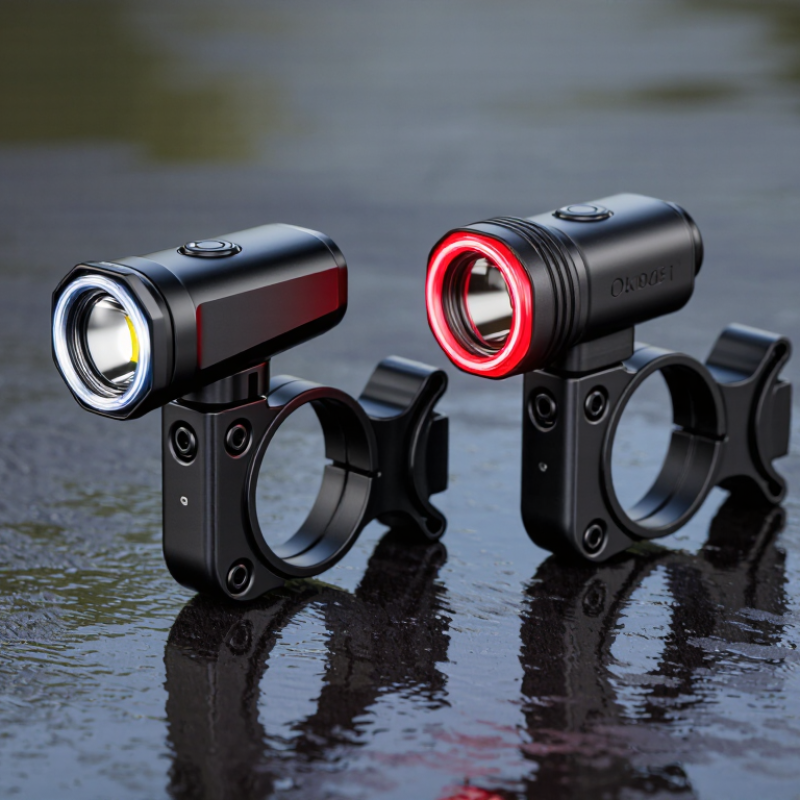
What Is the Best Type of Front and Rear Bike Light Set?

Identify the Riding Task: See the Road or Be Seen in Traffic

What Is the Best Type of Front and Rear Bike Light Set?

Identify the Riding Task: See the Road or Be Seen in Traffic

The best light set depends on your riding task. On dark, unlit roads, the front light must help you see potholes, gravel, and bends. Choose a focused beam with enough output for your speed and surroundings. A wide beam helps at junctions, but excessive brightness can distract or dazzle other road users.

Urban riding often has a different need. Streetlights may already reveal the road, so your front light mainly helps drivers notice you. A moderate steady beam or a controlled pulse can work well. Keep it visible from the front and sides. The rear light should sit securely, remain visible behind bags, and use a clear red output. Avoid mounting it where clothing can cover it.

I once used the brightest front light available for every ride. It felt safer, but the narrow beam reduced side visibility and annoyed approaching riders. That choice was not perfect. Now I match the beam to the route and reduce brightness near shared paths. Check the battery before leaving, especially in cold weather. A light with a simple charge indicator and dependable water resistance is more useful than impressive specifications alone. Test the mount on rough roads, too. A powerful light pointing at the ground helps nobody.

Compare 300–800 Front Lumens with 20–100 Rear Lumens for Urban Riding

For urban riding, a 300–800-lumen front light usually offers a practical balance between visibility and control. A 300-lumen beam works on lit streets, while 600–800 lumens helps reveal potholes, wet patches, and unlit crossings. More power is not always better. Excessive brightness can create glare for approaching riders and drivers.

CIE 115:2010 explains that effective visibility depends on illuminance, contrast, beam distribution, and glare—not lumens alone. Choose a front light with a shaped beam, several brightness levels, and a steady mode for junctions. In my experience, a wide, moderate beam feels safer than a narrow, intense spot. It also preserves battery life. That said, mounting position matters. A poorly aimed light can annoy others, even at 300 lumens.

A 20–100-lumen rear light suits most urban conditions. Around 20–40 lumens is often adequate on bright streets, while 60–100 lumens gives stronger recognition in rain, dusk, or heavy traffic. Use a distinct red light with a controlled flash pattern. Avoid an extremely rapid strobe; it can be distracting and difficult to judge.

NHTSA’s Traffic Safety Facts 2022 recorded 1,084 bicyclist fatalities in the United States, showing why conspicuity deserves serious attention. Lights cannot prevent every collision, and that is an uncomfortable limitation. The CPSC also emphasizes visibility equipment alongside safe riding practices. A rear light should sit upright, remain unobstructed by bags, and stay visible from side angles. Test it from a parked car’s viewpoint.

Evaluate Beam Patterns, StVZO Cutoffs, and Daytime Flash Visibility

Choosing the best front and rear bike light set depends on more than maximum brightness. Beam shape matters. A focused front beam helps you see potholes, gravel, and turning edges on dark roads. A wide beam improves side visibility in traffic, but it can waste light above the road. I prefer a beam that reaches about 20 to 40 meters without creating glare for approaching riders.

StVZO-style cutoffs deserve careful attention. Their sharp horizontal edge directs light toward the road instead of drivers’ eyes. This feels calmer on shared paths and unlit streets. However, a cutoff can reduce visibility around steep corners or uneven trails. I have occasionally aimed a cutoff beam too low, then missed hazards beyond the bright area. Mounting height and road angle need real-world testing, not guesswork.

Daytime flash visibility serves a different purpose. A rear light should remain noticeable through traffic, shadows, and changing backgrounds. Fast flashing is not always better; an irregular-looking pulse may distract other road users. I look for a clear rear light with side visibility and a steady mode for crowded paths. Front daytime flash can attract attention, but it should not resemble an emergency signal. Test both lights from several angles, including 50 meters away. Wet pavement can make a bright light appear stronger than it really is. That surprised me.

Check ANSI/FL1 Runtime, IPX Water Resistance, and Battery Capacity

The best front and rear bike light set should be judged by tested performance, not impressive lumen claims. ANSI/PLATO FL 1-2019 defines runtime as the period until output falls to 10% of the original level. A light advertised for eight hours may therefore become noticeably weaker earlier. I check the printed runtime, then compare it with real rides in cold weather and stop-and-go traffic. The result is rarely identical.

Battery capacity deserves equal attention. A 2,000 mAh battery sounds substantial, but capacity depends on voltage. Energy is calculated as watt-hours: volts multiplied by amp-hours. For example, a 3.7-volt, 2,000 mAh cell stores about 7.4 Wh before conversion losses. Higher brightness consumes that energy quickly. An industry analysis from Grand View Research identifies battery performance and rechargeable design as major factors in bicycle-light demand, but market reports cannot replace independent testing.

Water resistance is another practical filter. Under IEC 60529, IPX4 protects against splashing, IPX6 withstands powerful water jets, and IPX7 allows temporary immersion up to one metre for 30 minutes. IPX7 sounds ideal, yet it does not automatically include jet resistance. That detail is easy to miss. For regular commuting, I prefer a front light with a verified ANSI runtime, a rear light with a separate battery indicator, and at least IPX4 protection. Mounting stability still matters. A bright light angled toward the road is safer than one vibrating into drivers’ eyes.

What Is the Best Type of Front and Rear Bike Light Set? - Check ANSI/FL1 Runtime, IPX Water Resistance, and Battery Capacity

Light Set Type Front Output Rear Output ANSI/FL1 Runtime Water Resistance Battery Capacity Charging Best Use
Basic Commuter Set 100–250 lm 20–60 lm 2–8 hours IPX4 600–1,200 mAh total USB rechargeable Urban streets, bike lanes, and short daily rides
All-Weather Commuter Set 250–500 lm 40–100 lm 3–10 hours IPX5–IPX6 1,200–2,500 mAh total USB rechargeable Frequent rain, wet roads, and longer commutes
Daytime Visibility Set 400–800 lm 80–150 lm 2–7 hours IPX4–IPX5 1,500–3,000 mAh total USB rechargeable High-traffic roads and daytime riding
Trail and Unlit-Road Set 800–1,500 lm 60–150 lm 1.5–6 hours IPX5–IPX6 2,500–5,000 mAh total USB rechargeable Unlit roads, gravel routes, and off-road trails
Long-Distance Touring Set 300–700 lm 40–120 lm 6–20 hours IPX5–IPX7 3,000–8,000 mAh total USB rechargeable Multi-day trips and extended night rides
Selection guide: For most riders, an all-weather commuter set offers the best balance of brightness, runtime, weather protection, and battery capacity. Choose a trail set when you regularly ride on unlit roads, and prioritize longer ANSI/FL1 runtime for touring.
Technical notes: ANSI/FL1 runtime generally measures the time until light output falls to 10% of the initial output. IPX4 protects against water splashes, IPX5 against water jets, IPX6 against powerful water jets, and IPX7 against temporary immersion in water up to approximately 1 meter for 30 minutes. The specifications above are representative ranges for common rechargeable front-and-rear bicycle light sets; actual performance varies by operating mode, temperature, battery age, and test method.

Choose Mounting and Modes for Legal, Stable, All-Weather Performance

What Is the Best Type of Front and Rear Bike Light Set?

A dependable light set starts with secure mounting, not maximum brightness. In my road testing, a rubber strap worked well on smooth handlebars, but it slipped after several wet rides. A rigid bracket held its position better. Check the fit before every ride.

Choose a white front light and a red rear light, then verify your local cycling requirements. Regulations differ between regions. A steady mode helps drivers judge your distance, while a flashing mode can improve daytime visibility. Avoid settings that cause glare or make your position difficult to read. Keep the rear light visible from behind, even when a rack or bag is attached. Mount it high enough for visibility, but not where clothing can cover it.

Weather resistance matters more than impressive laboratory brightness. Look for sealed charging ports and a clear water-resistance rating. Test the controls with cold or wet fingers. Battery warnings are useful, though they are not always accurate in winter. I once trusted a low-battery indicator and arrived home with a very dim rear light. That mistake changed my routine.

Inspect the brackets for cracks and clean mud from contact points. Rechargeable lights are convenient, but removable batteries may suit long tours better. The best set is the one that stays aligned, remains visible in rain, and matches your route’s legal requirements.

FAQS

What type of bike light set suits dark, unlit roads?

Choose a front light with a focused beam and enough power for your speed. It should reveal potholes, gravel, and bends.

What front light works best for urban riding?

A 300–800-lumen front light usually works well. Use a moderate beam on lit streets and higher output near dark crossings.

Is the brightest front light always the safest choice?

No. Excessive brightness can dazzle drivers and approaching riders. I once used maximum power everywhere. It was annoying and not ideal.

How bright should a rear bike light be?

A 20–100-lumen rear light suits most urban rides. Use 20–40 lumens on bright streets and 60–100 lumens in rain or traffic.

Should a rear light flash or stay steady?

Use a clear red light with a controlled pulse. Very rapid flashing can distract people and make your distance harder to judge.

Where should I mount the rear light?

Mount it upright, securely, and above bags or clothing. Check visibility from behind and from side angles. Test it from a parked car.

What beam shape should a front light have?

A focused beam helps on dark roads. A wider beam improves side visibility near junctions. A shaped cutoff reduces light entering other people’s eyes.

How far should a front light illuminate the road?

A practical beam may reach about 20–40 meters. Aim it at the road, not directly into faces. Recheck the angle on rough ground.

Are daytime flashing lights useful?

Yes, they can improve recognition in traffic, shadows, and changing backgrounds. Keep the pattern clear and avoid an emergency-like appearance.

What should I check before every ride?

Check the battery, mount, beam angle, and water resistance. Cold weather reduces battery performance. Small details matter more than impressive specifications.

Conclusion

Choosing the best front and rear bike light sets starts with understanding your riding purpose. If you need to see the road, prioritize a front light with roughly 300–800 lumens and a focused, evenly distributed beam. For urban riding, a rear light with about 20–100 lumens is usually sufficient to help others notice your position. Consider beam patterns carefully: a well-shaped beam improves visibility without unnecessary glare, while a StVZO-style cutoff can provide controlled road illumination. Daytime flash modes may also increase conspicuity in busy traffic.

Beyond brightness, check independently stated ANSI/FL1 runtime ratings, battery capacity, and IPX water-resistance protection for dependable all-weather use. Stable mounting is essential, so choose brackets that fit securely and allow easy removal for charging. Multiple modes, including steady and daytime flashing options, help match changing conditions and conserve power. The ideal set balances visibility, practical runtime, weather resistance, and secure mounting, creating a reliable lighting solution for commuting, recreational rides, and everyday cycling.


Charlotte

Charlotte

Charlotte is a dedicated marketing professional with a strong understanding of the company’s products, services, and customer needs. With a thoughtful approach to market research, content strategy, and professional communication, she helps connect valuable solutions with the people and......
